Deprecated: Function create_function() is deprecated in /home/elizab32/public_html/blog/wp-content/themes/prophoto5/classes/pathfixer.php on line 20
Deprecated: Function create_function() is deprecated in /home/elizab32/public_html/blog/wp-content/themes/prophoto5/classes/pathfixer.php on line 22
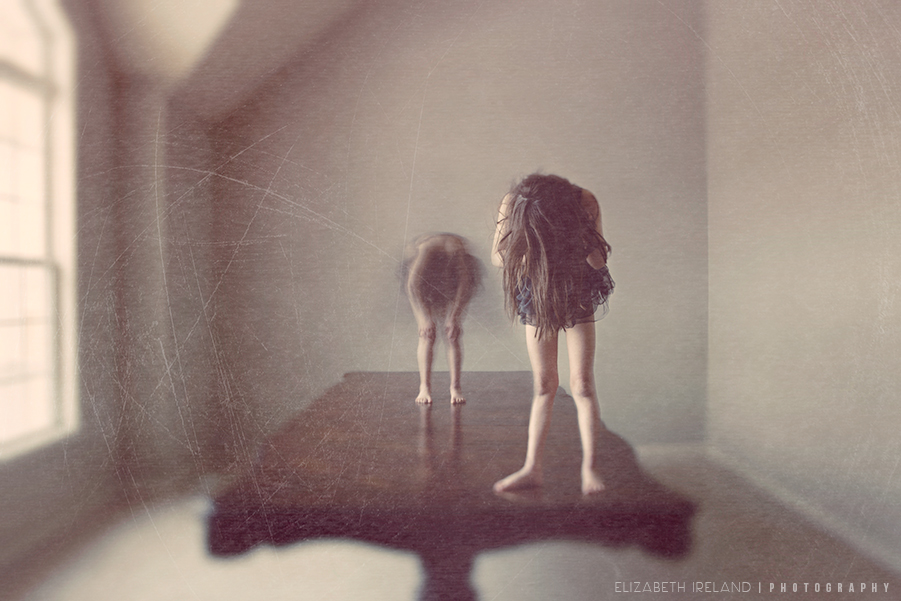
Inspiration: The Tragic Ballerina series was inspired by a quirky behavior that my daughter has where she covers her face with her hair and crawls down the steps. It is reminiscent of horror flicks like the The Ring or The Grudge (neither of which has she seen). She also really wants to be a ballerina, despite the fact that she is less than graceful and often likes to grumble like a zombie.
The Scene: With the weather dipping into the 20’s, we were limited to shooting indoors. I decided to use my dining room because of its large window and the general available light. I removed most of the furniture from the room leaving the long dining room table. The table serves as a stage for the ballerina as well as adding to the visual perspective. I asked her to roll her back forward and hunch her shoulders, then I just asked her move in “a scary way”. She gave me exactly what I was looking for but had she not, I would have asked her to gently sway side to side.
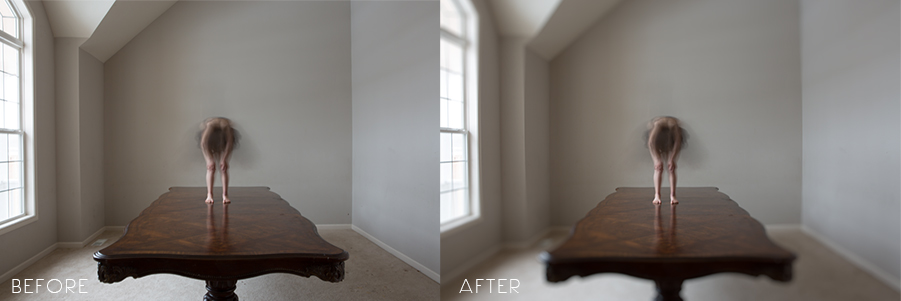
Production: I used a Canon 5D MK3 and a Canon 24-70 2.8 L lens. The image is a combination of two images. The “ring” like character was shot handheld with support from a tripod. The camera settings were–Aperture: F16, Shutter Speed: 2 seconds, ISO 100. This image was manually focus to be in focus.
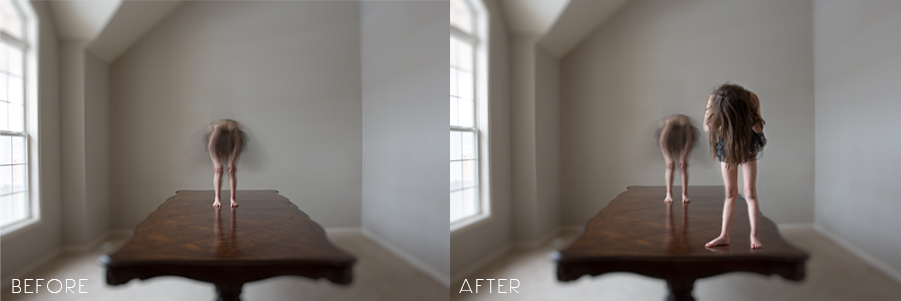
The second image (in focus little girl) was shot on a tripod with settings of F2.8, 1/80 second shutter speed, and ISO 640. This image was also manually focused to be in focus. Others within this series were deliberately shot OOF for artistic effect.
Post Production:
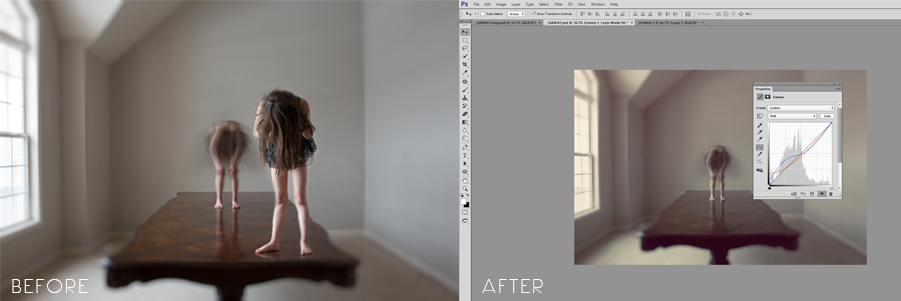
White Balance: I pulled the two images into ACR and manually adjusted the white balance. I used my expodisc when shooting and it was a warm, true to life color, but I wanted a cooler white balance with a slightly greenish tint. I took the WB from 5100 to 4700 and adjusted the tint slider from +12 to +2. I adjusted all the images within the series and moved onto to Photoshop.
Tilt Shift: Once in Photoshop, I added the tilt shift effect via Alien Skin Bokeh2. This took the visual interest off of the ornate table, which was placed in the center of the foreground. With the top and bottom effectively blurred, the “figure” on the table was the sole interest.
Composite: The next step in the process was to add in the second image of the little girl. I duplicated the image layer and placed it into the first image. I repositioned her into the bottom right portion of the table and used free transform to size her so that her proportions were correct for her placement within the frame. I finished by using a layer mask and carefully masking off the area around her. I paid special attention to the area around and between her legs to make sure that I didn’t lose any leg detail and so that the tonality behind her was accurate.
Toning: I wanted the series to have a sickly sweet tonality to them. In order to do this I added a pink gradient and a solid pink layer (#ce9e7b) that was set to multiply at 25% opacity. On top of that layer, I added a yellow (#e0d7a2) solid color set to color at 25% opacity. This layer added the sickly feel to the image and added yellow to her skin (as well as other areas). The final layer was a curves layer set to normal at 40% opacity.
Special Effects: I love Alien Skin products and I really like to use them to polish an image. In this case I used Bokeh2 (as explained earlier) and then Exposure5 to distress the image. The first layer was a softly worn paper (adjusted the opacity and protection sliders), which helped brighten the whole image and muted the shadows in the foreground. This layer was used specifically to add to the feminine feel or sweetness of the image. Then, on another layer, I added the scratches (adjusted with the zoom slider to best fit the proportions of the image) to reflect the horror aspect of the image and increase the viewers anxiety over what is happening within the image.
As with all of my images, this is open for interpretation beyond the brief description I gave above. I would encourage you leave your comments about what you see within the image and how that makes you feel.